
The good news: sludge is manageable. The better news: it's largely preventable.
This guide covers what oil tank sludge actually is, what forms it, how to spot it early, and how to clean it — from DIY methods for residential tanks to professional robotic systems for industrial-scale facilities. It also covers what happens when you ignore it, and why the cleanup costs dwarf the cost of prevention.
TL;DR
- Oil tank sludge is a dense mix of water, rust, oxidized fuel, dirt, and microbial waste that settles at the tank bottom over time
- Condensation entering through vent pipes, combined with microbial activity at the fuel-water interface, drives most sludge formation
- Warning signs include clogged filters, reduced heat output, unusual system noises, and visible fuel discoloration
- Cleaning options range from DIY manual cleaning and chemical additives to professional and robotic industrial systems
- Consistent maintenance — annual filter changes, fuel additives, and keeping tanks full — stops most serious buildup before it starts
What Is Oil Tank Sludge and What Causes It?
Oil tank sludge is a dense, dark sediment that accumulates at the bottom of fuel storage tanks. It's not a single substance — it's a mixture of water, rust particles, dirt, oxidized petroleum molecules, and waste byproducts from bacteria and fungi that feed on hydrocarbons. Research published in PMC confirms that industrial petroleum sludge typically comprises 20–60% oil, 30–80% water, and 5–60% solids, including sand, clay, metal compounds, and asphaltenes.
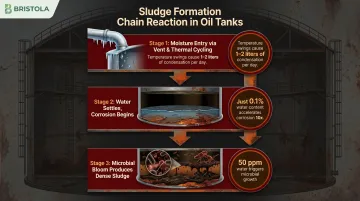
How Condensation Starts the Process
Every oil tank has a vent pipe that allows air in and out to maintain pressure equilibrium. That incoming air carries moisture. When temperatures shift, that moisture condenses on the tank's cooler interior walls and drips to the bottom — settling beneath the fuel layer.
That water layer drives a chain reaction:
- Water accumulation triggers rust and internal corrosion on steel tank walls
- The fuel-water interface creates an ideal environment for microbial growth — bacteria like Pseudomonas and Bacillus and fungi like Hormoconis resinae feed on hydrocarbons, producing acidic metabolic byproducts and thick biomass as waste
- As little as 50 parts per million of water can support microbial proliferation, with populations capable of doubling every 20 minutes under favorable conditions
Why Low Fuel Levels Accelerate the Problem
A tank sitting partially empty has more interior air space, more condensation surface area, and more fuel exposure to reactive elements. This is why seasonally used tanks — or residential tanks left near-empty through spring and summer — tend to accumulate sludge faster than tanks kept consistently full.
Fuel chemistry compounds this further. Modern ultra-low-sulfur heating oil has had its sulfur content reduced from 3,000 ppm to 15 ppm to cut emissions, but that same refining process stripped out components that naturally inhibited microbial growth — leaving today's fuel more vulnerable to sludge formation during storage.
At industrial scale, the same mechanisms apply. The petroleum industry generates roughly 60 million tons of oily sludge globally per year — spanning oil and gas facilities, refineries, and large liquid storage operations worldwide.
Warning Signs Your Oil Tank Has a Sludge Problem
Reduced Performance and Efficiency
Sludge obstructs the fuel supply line and clogs oil filters, restricting fuel flow to the furnace or boiler. The system compensates by working harder, consuming more fuel for the same heat output and driving up energy costs.
Standard practice calls for annual oil filter replacement. When sludge is present, that interval should drop to twice per year. If your filters are clogging faster than normal between service visits, sludge is likely already affecting your system.
Unusual Noises and System Behavior
When sludge interferes with fuel delivery, it produces recognizable symptoms:
- Sputtering, banging, or erratic burner behavior
- Frequent unexpected shutdowns requiring manual restarts
- Inconsistent flame or combustion output
- In industrial tanks: pressure fluctuations or output inconsistencies
These symptoms typically indicate the system isn't receiving a steady fuel supply — which is exactly what happens when sludge restricts the line or overwhelms the filter.
Visible Buildup and Tank Deterioration
Physical warning signs worth checking:
- Discolored or black sludge visible through inspection ports
- Rust on exterior tank surfaces or at connection points
- Oil filters with heavy dark sediment discovered during annual service
- Pinhole leaks or staining on the ground beneath the tank
For many operators and facility managers, heavy sediment discovered during a routine service visit is the first formal alert. Don't wait for that. A visual inspection costs nothing and can catch problems before they escalate into emergency repairs. Leak remediation can range from $4,000 to over $100,000 depending on contamination extent.
How to Clean Oil Tank Sludge: Methods and Steps
The right cleaning method depends on tank size, sludge severity, and whether downtime is an option. Small residential tanks can often be handled DIY. Larger commercial and industrial tanks require professional intervention — the confined space risks alone make manual entry a serious safety liability.
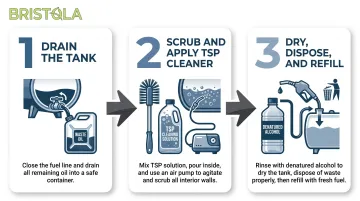
DIY Manual Cleaning (Residential Tanks)
Step 1 — Drain the tank Position collection containers under the drain valve. Open and fully drain all oil. Flush with clean water until the water runs clear, then seal the valve. Drained oil is contaminated — do not reuse it.
Step 2 — Scrub and apply cleaner Wipe sludge from interior walls and the drain area with cleaning rags. Mix trisodium phosphate (TSP) or a phosphate-free TSP alternative with water at the manufacturer's recommended ratio. Fill the tank with the solution, insert an air hose connected to a portable pump, and agitate for 12 hours before draining. (Note: phosphate-based cleaners are restricted in some states — check local regulations before purchasing.)
Step 3 — Dry, dispose, and refill Pour approximately 3 gallons of denatured alcohol into the tank and circulate with the air pump for about an hour to absorb residual moisture. Once fully dry, refill with fresh fuel. Contact your state's hazardous waste disposal service or the EPA's household hazardous waste program for proper disposal of contaminated oil and sludge — it cannot go down the drain or into regular trash.
Chemical Treatment (Additive Method)
Sludge dispersant additives break down sediment particles small enough to pass through fuel lines and burn off during normal combustion. They typically also remove water, inhibit microbial growth, and prevent wax buildup.
Additive categories to know:
- Stabilizers — prevent fuel oxidation during storage
- Water controllers — emulsify or absorb moisture
- Biocides — kill bacteria and fungi at the fuel-water interface
- Line and nozzle cleaners — dissolve existing deposits
This method works well as a maintenance tool or for mild buildup. It's not a substitute for a full clean when sludge is already heavy. Using it on a near-empty tank with significant accumulation risks pushing loosened sediment directly into the filter — which can trigger an immediate shutdown.
Professional and Industrial Tank Cleaning
Professional cleaning is warranted when:
- Sludge accumulation is severe or corrosion is advanced
- The tank is industrial-scale with large sludge volumes
- Confined space entry is required for manual cleaning
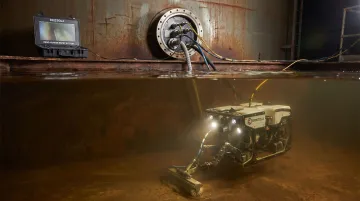
Traditional professional methods involve draining the tank, halting operations, and sending workers inside — a process carrying real safety risks. BLS data shows 1,030 confined-space fatalities in the U.S. between 2011 and 2018, with atmospheric hazards responsible for roughly 60% of those deaths.
Bristola's robotic cleaning system was built specifically to eliminate that risk. Founded in 2019 by Jared Burma — himself a survivor of a near-death incident inside a storage tank — Bristola developed a patented equalization chamber entry system that functions as an airlock-type mechanism. A remote-controlled submersible ROV enters the tank through a proprietary entry portal without draining the contents or halting operations.
For oil and gas facilities, refineries, and large liquid storage operations, Bristola's internal cost modeling puts the numbers in sharp relief:
| Method | Annualized Cost Per Tank | Includes Downtime Revenue Loss |
|---|---|---|
| Traditional cleaning | ~$250,000 | Yes |
| Bristola robotic system | ~$170,000 | Yes |
| Savings | ~$80,000/year | — |
Those figures have held up in practice. Bristola's system is deployed across multiple industrial sectors, with clients including Shell.
How to Prevent Oil Tank Sludge Buildup
Prevention costs far less than remediation. Most serious sludge problems trace back to deferred maintenance, not bad luck.
Keep the tank filled above the halfway mark. Less air space means less condensation surface area. For residential tanks, maintaining that level through spring and summer limits moisture ingress and microbial growth. Industrial tanks benefit from consistent fill cycles tied to operational schedules for the same reason.
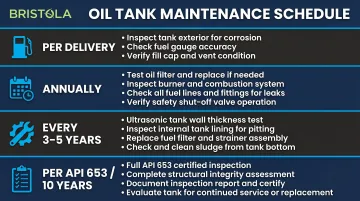
A proper annual service visit should cover the basics that most operators overlook between cleanings:
- Replace the oil filter
- Inspect for water accumulation at the tank bottom
- Check for early sludge deposits before they compact
- Add preventive dispersant treatments
- Verify vent cap integrity
Use fuel additives proactively. Add a dispersant-based treatment before each new fuel delivery to break down minor accumulation before it hardens. Check with your supplier first — some oils already include inhibitor additives, and doubling up isn't always necessary.
On the supply side, premium heating oil and low-sulfur fuel contain fewer impurities and produce less sediment over time. A reputable supplier delivering clean, treated fuel reduces long-term maintenance costs.
Physical condition matters just as much as what goes into the tank. A loose or damaged vent cap accelerates moisture and debris ingress — and it's one of the easiest things to miss between scheduled visits. Vent cap integrity should be confirmed at every annual inspection. Tanks over 20 years old showing rust, pinhole leaks, or repeated sludge problems may be better candidates for replacement than repeated cleaning.
Oil Tank Sludge Cleaning Schedule
Cleaning frequency depends on usage intensity, fuel quality, tank age, and operating environment. There's no single number that applies to every situation — but the table below provides a useful reference.
| Frequency | Task |
|---|---|
| Per delivery | Monitor fuel level; add proactive sludge dispersant additive |
| Annually | Replace oil filter; inspect for water and sludge; check vent cap; add biocide treatment |
| Every 3–5 years | Full drain and clean for residential tanks; condition-based professional cleaning for industrial tanks |
| Per API 653 | Internal inspection at least every 10 years for aboveground storage tanks (adjustable by corrosion rate) |
For industrial tanks in continuous operation, calendar-based scheduling is less reliable than condition-based inspection findings. Facilities using robotic cleaning systems like Bristola's operate on scheduled service cycles that run without production shutdowns, which can significantly reduce or eliminate planned cleanout downtime.
Sludge management is not optional. Scheduled maintenance protects tank lifespan, preserves fuel system efficiency, and keeps emergency repairs and environmental remediation events off the table — both of which carry costs that dwarf any routine service budget.
Frequently Asked Questions
What causes sludge or gunk to form in my oil or kerosene tank?
Sludge forms when moisture — entering through the vent pipe and condensing on interior tank walls — settles beneath the fuel layer. That water creates the ideal environment for bacteria to feed on hydrocarbons and produce thick sediment as waste. Low fuel levels and infrequent maintenance accelerate both the condensation and microbial processes.
How do you remove sludge from a fuel or oil tank?
Three main approaches: DIY manual cleaning (drain, TSP clean, dry with denatured alcohol, refill); chemical dispersant additives for mild buildup; and professional cleaning for severe cases or industrial tanks. Large industrial facilities increasingly use robotic systems — like Bristola's zero-human-entry ROV — that clean without draining the tank or halting operations.
How much does it cost to have an oil tank cleaned?
Residential cleaning costs vary by provider, region, and sludge severity; environmental remediation if a leak is involved can run $4,000 to over $100,000. For industrial tanks, the main cost drivers are tank volume, sludge depth, cleaning method, and required downtime.
How often should an oil tank be cleaned for sludge?
Residential tanks generally need a full clean every 3–5 years. Industrial tanks should follow condition-based inspection schedules rather than strict calendar intervals. Annual maintenance — filter changes, additive treatments, visual inspections — reduces how often full cleanouts become necessary.
Can oil tank sludge cause the tank itself to fail?
Yes. Prolonged sludge buildup accelerates internal corrosion through microbially influenced pitting, which can eat through steel and create pinhole leaks. A failed residential tank risks costly oil spills and environmental remediation. Industrial tank failures carry even greater consequences for operations, regulatory compliance, and surrounding environments.
When should I replace my oil tank instead of cleaning it?
Replace when the tank is already leaking, shows heavy external rust, is over 20–25 years old with repeated sludge history, or when remediation costs exceed the value of keeping it. Steel above-ground tanks typically last 15–20 years; fiberglass and polyethylene tanks last 20–30 years.